Building a “NMEA via Mini-B” Cable
Some Garmin GPS receivers have the ability to output real-time data in standard NMEA serial port format over the Mini-B USB connector on the receiver. Using this data with MacGPS Pro requires a special cable. Complete ready-to-use cables for this application are no longer available from Garmin. However James Associates Inc. provides these instructions for you to construct your own cable. You will need the following items:
- A Garmin 010-11131-00 power-data cable.
- A female DB-9 RS232C connector and shell with hardware.
- A Keyspan USB-to-Serial Adapter model number USA-19HS.
You will use the following tools:
- A small soldering gun or soldering iron.
- Electronic solder.
- A wire cutting tool.
- A wire insulation-stripping tool.
- A small Phillips screwdriver.
- A small standard screwdriver.
Follow these steps to assemble the interface cable:
 Locate the Garmin 010-11131-00 power-data cable. Cut the yellow wire, the white wire and the green wire each to a length of about 1 inch from where they emerge from the black cable covering. Strip 1/8 inch of insulation from the end of each of these three wires.
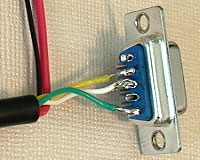 Locate the DB-9 connector. Solder the yellow wire to pin 2, the white wire to pin 3, and the green wire to pin 5. The pin numbers are usually embossed on the plastic next to the wire receptacle of each pin. Check that there are no shorts between pins due to excess solder, and that the bare parts of the wires do not touch.
 Locate the two pieces of the cable clamp and two short screws. Attach the cable clamp around the outer black part of the cable just above where the wires emerge. Tighten both screws.
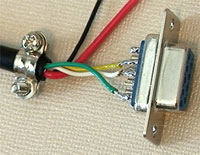
 Locate the plastic shell for the DB-9 connector. Place half of it down on your work area with the inner part of the shell facing up. Insert the DB-9 connector and the cable clamp into the shell as shown. Bend the red wire and the black wire back so they exit the shell next to the black cable.
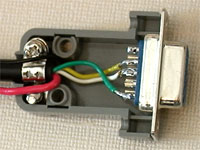
 Locate the long screws which only have threads over part of their length, and the two remaining metal brackets. Put one screw through the hole in one bracket, with the bends in the bracket heading away from the screw head. Then place the screw onto the shell with its tip going through one of the side holes in the connector. Repeat for the other screw and bracket.
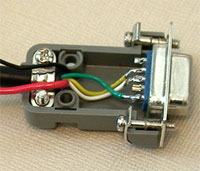
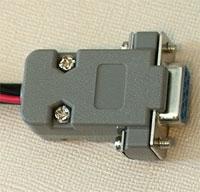 Locate the other half of the plastic shell, and the remaining two screws and two nuts. Place the top part of the plastic shell onto the bottom half. The red and black wires must go through the hole in the back with the main cable; they cannot be clamped between the edges of the shell. Hold the shell together. Insert the screws and thread them into the nuts which you place on the other side of the shell. Tighten both screws firmly, but not overly tight.
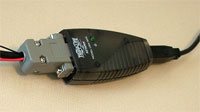 Locate the Keyspan adapter. Plug the DB-9 connector into it. Tighten both screws which lock the connectors together.
- This cable requires a source of 8 to 36 volts DC electrical power in order to operate. The black wire connects to the negative terminal (-) of the power source. The red wire connects to the positive terminal (+). The power source provides power both to the electronics built into the cable and to the connected GPS receiver. This kit does not include a connector for the power source, as so many different options are possible. In a car you might use a cigarette lighter power adapter. On a boat, you might wire it directly into the boat's 12 volt power system. At home, you might use a small commercial DC power supply with screw terminals.
To use this cable, connect the power supply and turn it on. Plug the Mini-B connector into the GPS receiver. Plug the standard USB connector from the Keyspan adapter into a USB port on your computer.